This is an XBMC Service that will update your music and video libraries on a timer. You can select a different interval to scan your media databases (Audio,Video,Both) or you can set a cron-style timer for greater control. If you are playing an audio or video file when the timer starts it can skip the library update process until it is completed so that you’re media experience is not interrupted. Updating a specific Video Path, and Cleaning the Music/Video libraries is now supported.
1 Installing
This add-on is installed from the Add-on browser located in Kodi as follows:
The XBMC Library Updater will update your music and/or video libraries according to times specified by you. Thanks to pkscuot for several small tweaks to this addon!
All source files for this addon can be found via the Github page.
3 How to use
A note on Timers:
Standard Timer – specify an interval to run the library update process. It will be launched every X hours within the interval unless on of the conditions specified by you as been met (don’t run during media playback, etc) in which case it will be run at the next earliest convenience.
Advanced Timer – specify a cron expression to use as an interval for the update process. By default the expression will run at the top of every hour. More advanced expressions can be configured such as:
   .--------------- minute (0 - 59)
   |   .------------ hour (0 - 23)
   |   |   .--------- day of month (1 - 31)
   |   |   |   .------ month (1 - 12) or Jan, Feb ... Dec
   |   |   |   |  .---- day of week (0 - 6) or Sun(0 or 7), Mon(1) ... Sat(6)
   V   V   V   V  V
   *   *   *   *  *
Example:
0 */5 ** 1-5 - runs update every five hours Monday - Friday
0,15,30,45 0,15-18 * * * - runs update every quarter hour during midnight hour and 3pm-6pm
/data – path for kodi data and configuration files
Environment Variables
KODI_DB_HOST – MySQL database host address (default mysql)
KODI_DB_USER – MySQL user for Kodi (default kodi)
KODI_DB_PASS – MySQL password for Kodi user (default kodi)
KODI_DB_PORT – MySQL remote port (default 3306)
KODI_UID – The user ID to run all processes in the container under (default 2000)
KODI_GID – The group ID to run all processes in the container under (default 2000)
TZ – The timezone to use in the container (default UTC)
Tags
Tagname
Branch
Kodi version
Base distro
Architecture
latest
Matrix
19.3
Ubuntu 22.04
amd64, armv7, arm64
Matrix
Matrix
19.3
Ubuntu 22.04
amd64, armv7, arm64
19.3
Matrix
19.3
Ubuntu 22.04
amd64, armv7, arm64
19.2
Matrix
19.2
Ubuntu 20.04
amd64
19.1
Matrix
19.1
Ubuntu 20.04
amd64
Docker will automatically pull the correct architecture for your platform.
User / Group Identifiers
Sometimes when using data volumes (-v flags) permissions issues can arise between the host OS and the container. We avoid this issue by allowing you to specify the user KODI_UID and group KODI_GID. Ensure the data volume directory on the host is owned by the same user you specify and it will “just work” ™.
In this instance KODI_UID=1001 and KODI_GID=1001. To find yours use id user as below:
  $ id <dockeruser>
    uid=1001(dockeruser) gid=1001(dockergroup) groups=1001(dockergroup)
Setting up the application
The database connection settings will be automatically configured the first time the container is started and stored in /data/.kodi/userdata/advancedsettings.xml. Many other settings are within this file, also. You may modify this file after it is generated. You may also mount your own version. If you mount your own version, the database configuration variables (KODI_DB*) will not be used.
If you intend to use this kodi instance to perform library tasks other than merely updating, eg. library cleaning etc, it is important to copy over the sources.xml from the host machine that you performed the initial library scan on to the userdata folder of this instance, otherwise database loss can and most likely will occur.
Info
Shell access whilst the container is running: docker exec -it kodi-headless-novnc bash
To monitor the logs of the container in realtime: docker logs -f kodi-headless-novnc
Fast Scanning //이건 어떻게 되는지 잘 안됨…폴더는 보이는데, 접속이 안됨..
The below works if your media is stored on the same machine as this docker container and your using smb:// to share that media on the network.
First, mount your host media directory somewhere inside the container so Kodi can see it. eg. --mount type=bind,source=/sharedfolders/pool,target=/media
Now, the below magic is done in Kodis advancedsettings.xml
That’s it. Now instead of always needing to scan over smb://, it will replace that with /media and scan much quicker. When it does find new items, they are correctly stored in the SQL using their smb:// path
크론 스케쥴러(Cron Scheduler)에 사용하는 크론 표현식(Cron Expressions에 대해서 알아보자
크론 표현식이란?
크론(Cron)을 구동할 때 스케쥴링의 파라미터로 사용되는 식을 크론 표현식(Cron Expressions)라고 한다. 유닉스/리눅스 기반의 스케쥴러에도 사용되지만 Quatz 스케줄러 에서도 사용된다. 크론 표현식은 필드와 특수문자를 조합하여 스케쥴링을 조절할 수 있다.
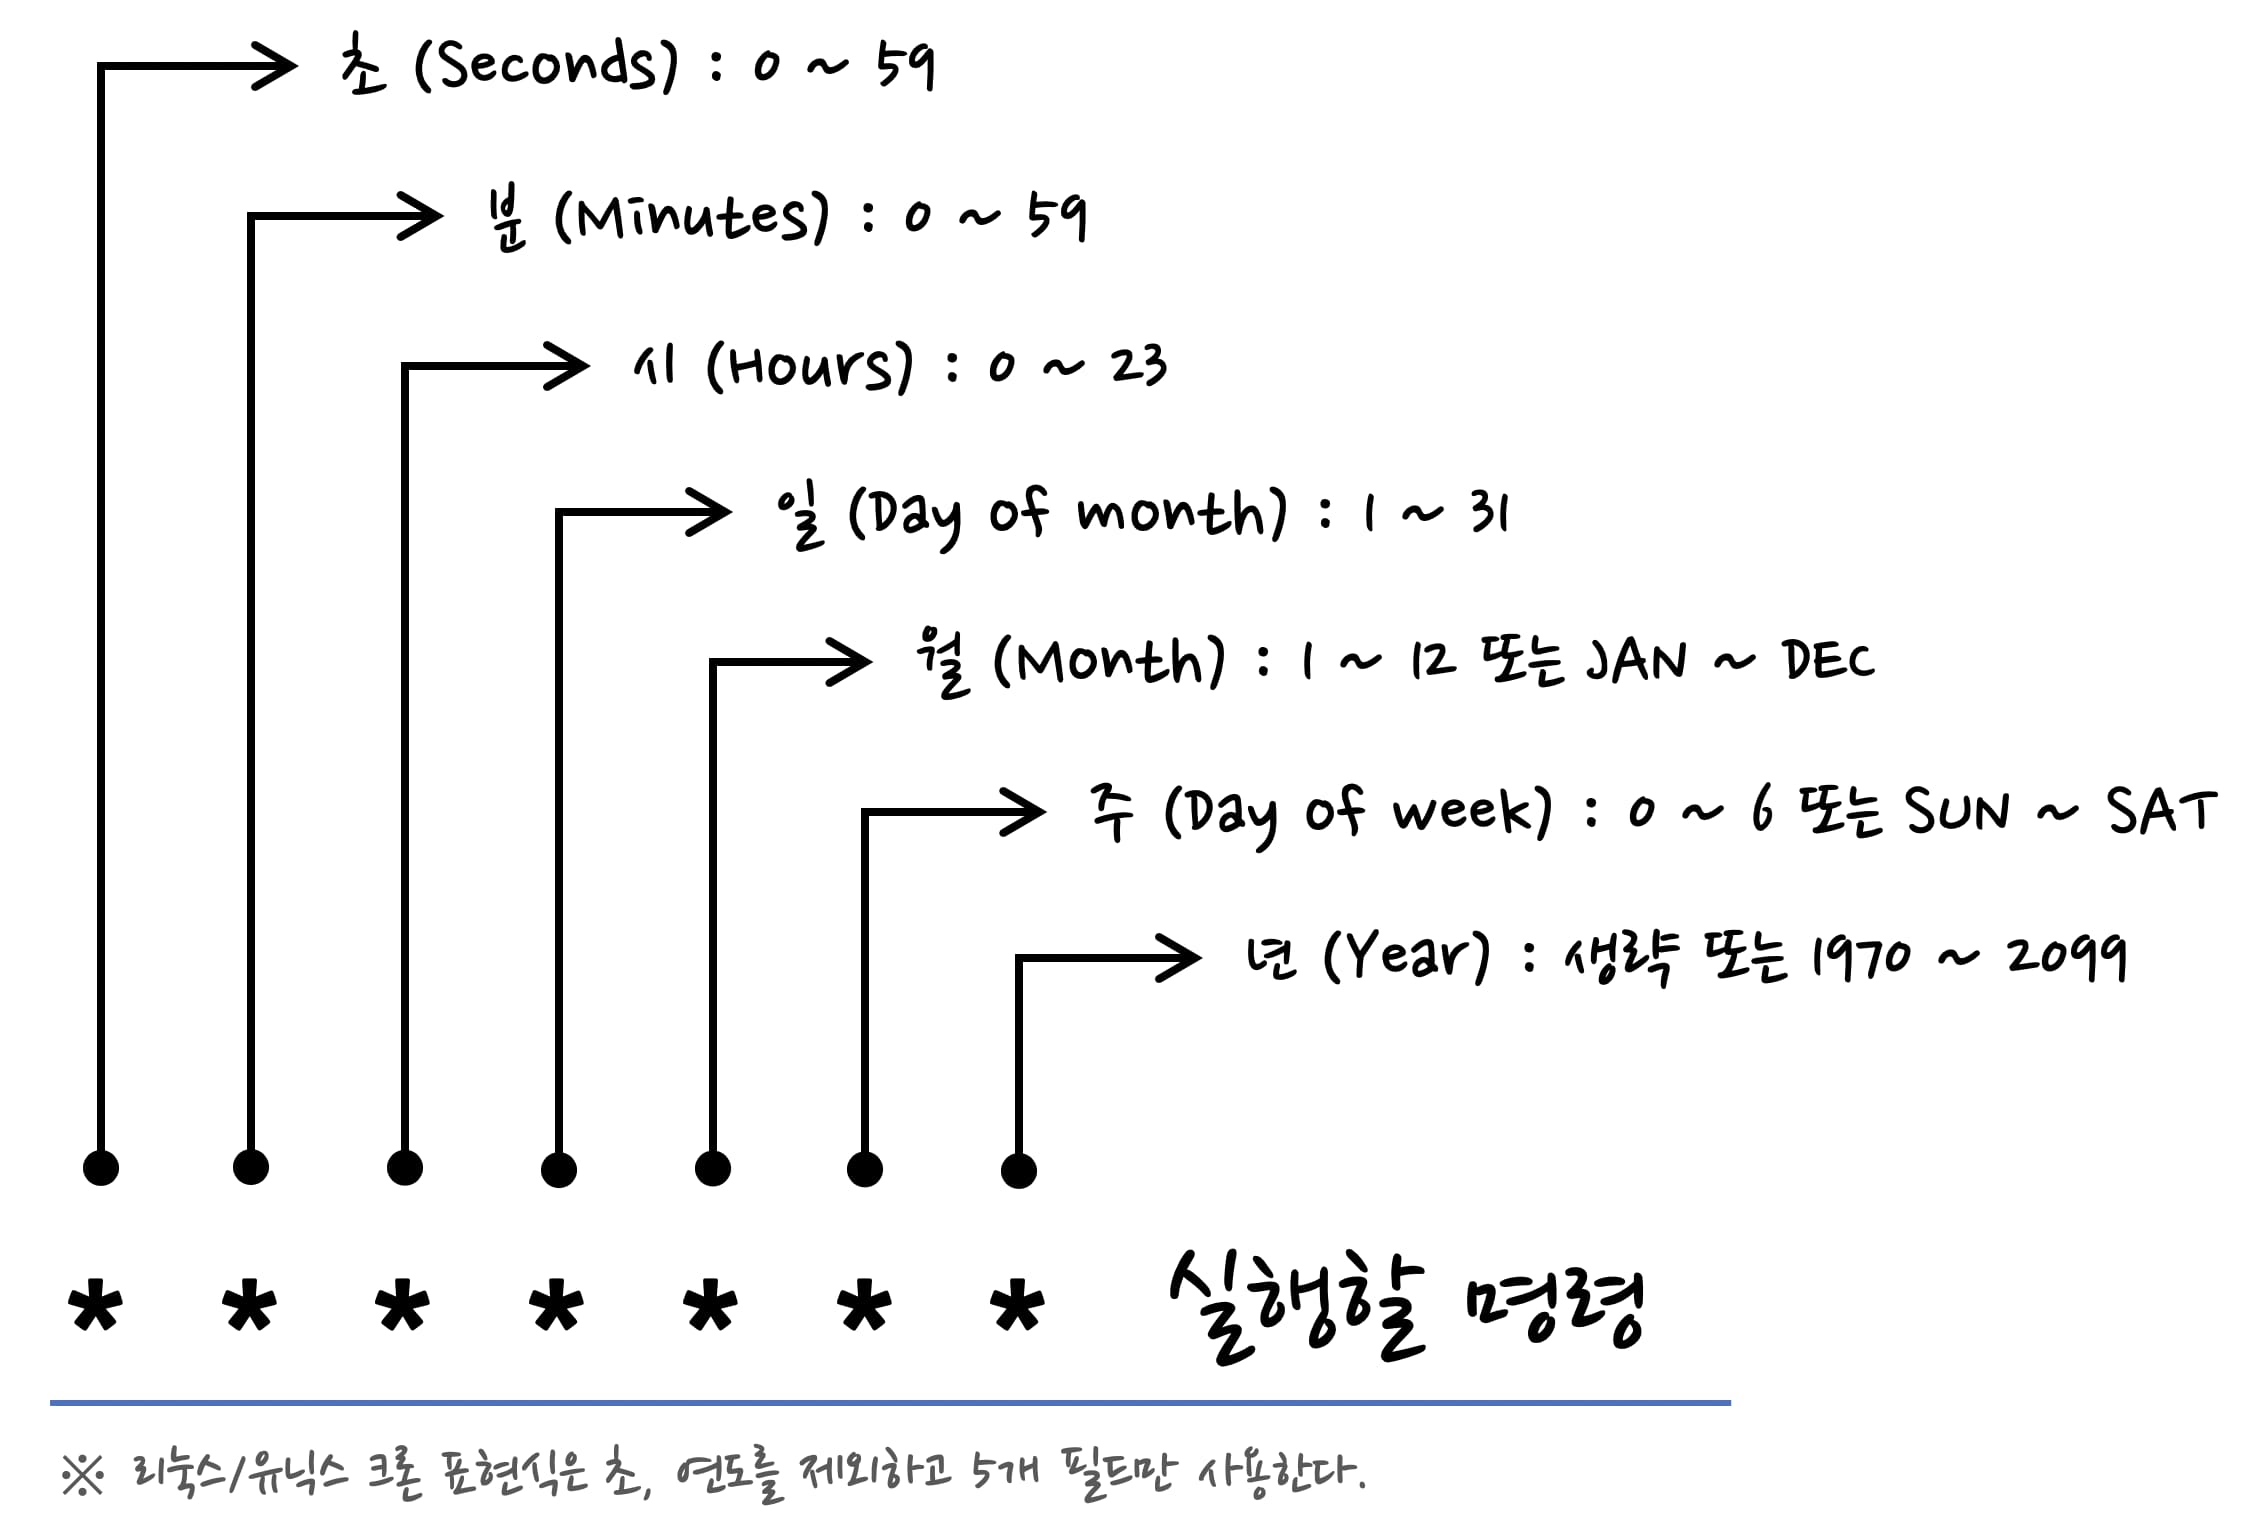
크론 표현식: 구성
크론 표현식은 아래와 같은 형태로 구성된다. 리눅스/유닉스 크론 표현식에서는 5개 필드가 사용되고, 쿼츠 크론 표현식에서는 7개의 필드가 사용된다.