I will install FFmpeg from the default repositories. Open a new terminal (CTRL+ALT+T) and then run the following commands.
$ sudo apt update
$ sudo apt install ffmpeg
$ ffmpeg -version

오늘은 또 무슨 좋은 일이 ^^; ??
I will install FFmpeg from the default repositories. Open a new terminal (CTRL+ALT+T) and then run the following commands.
$ sudo apt update $ sudo apt install ffmpeg $ ffmpeg -version
synosystemctl restart name..서비스네임은 우찌찾지 예전에는 synoservice –status로 조회되었는데…
3 February 2021 by Marius Bogdan Lixandru

A Linux command line is a text interface to your Synology NAS. Often referred to as the shell, terminal, console, prompt or various other names, it can give the appearance of being complex and confusing to use. This little guide will teach you some basic command lines for your DSM 7, to become familiar with SSH. Let’s assume there’s no prior knowledge, but by the end I hope you’ll feel a bit more comfortable the next time you’re faced with some instructions that begin with “Open a terminal” and log into your NAS. Note: DSM is a Linux operating system for Synology DiskStation and RackStation products.
Please Support My work by Making a Donation.
Follow my step by step guide on How to SSH into a Synology NAS. After that, try some basic command lines below.
Note: Be careful! Use only the command lines you need.
vi /location_of_file/file_name
cd /directoryName
mkdir /directoryName
dir
find . -type f | wc -l
du -ah /path/to/dir
find / -name fileName
rm fileName
rm -r directoryName
mv /sourceDirectory/sourceFile /destination
cp /sourceDirectory/sourceFile /destination
cp /sourceDirectory/*.* /destination
cp -r -p /sourceDirectory /destinationpath
To create an uncompressed (.tar) archive of all files, directories and subdirectories in the current directory:
tar -cvf archivefilename.tar *
To create a compressed (.tgz) archive of all files, directories and subdirectories in the current directory:
tar -cvzf archivefilename.tgz *
For uncompressed .tar archives
tar xvf file.tar
For gzip compressed .tar.gz archives
tar xvzf file.tar.gz
reboot
poweroff
kill processID
killall programName
top
df
ps
netstat -an
If you are logged in as root/admin you can open a new shell as if you just logged in as another user, substitute xxx with the user name. To return to root session use the command line “exit”.
su – xxx
Note: Install IPKG.
ipkg install fileName
ipkg remove filename
/usr/syno/etc/rc.d/S97apache-user.sh restart
/usr/syno/etc/rc.d/S81atalk.sh restart
/usr/syno/etc/rc.d/S04crond.sh stop
/usr/syno/etc/rc.d/S04crond.sh start
systemctl restart crond
systemctl restart synoscheduler
/usr/syno/etc/rc.d/S99ftpd.sh restart
/usr/syno/etc/rc.d/S66synoindexd.sh restart
/usr/syno/etc/rc.d/S99itunes.sh restart
/usr/syno/etc/rc.d/S21mysql.sh restart
/usr/syno/etc/rc.d/S83nfsd.sh restart
/usr/syno/etc/rc.d/S20pgsql.sh restart
/usr/syno/etc/rc.d/S80samba.sh restart
/usr/syno/bin/synosystemctl restart sshd.service
cat /proc/meminfo
cat /proc/cpuinfo
cat /proc/interrupts
cat /proc/filesystems
tune2fs -l /dev/hda3
cat /proc/version
cat /proc/mdstat
env
cat /proc/diskstats
or for all NAS types
cat /proc/partitions
or for similar, but different info
fdisk -l
clear
Note: The command line above also works perfectly with DSM 6.2.4
This post was updated on Monday / February 7th, 2022 at 9:20 PM
sudo add-apt-repository ppa:danielrichter2007/grub-customizer
sudo apt-get update
sudo apt-get install grub-customizer
Can you boot from an exFAT USB? Absolutely, but not by using a typical approach to USB booting. In order to make an exFAT bootable USB flash drive boot in UEFI mode, you will need to format the USB with multiple partitions. Then, install Grub2 on the boot partition. And finally, set your computer system to boot from the flash drive to confirm that it boots.
This process works for both Legacy BIOS and EFI booting. To be able to USB UEFI boot requires the creation of a second Fat/Fat32 partition, which is also covered in this segment.
Additional Notes: We will be creating an exFAT partition to be used for storing ISO files and for your traditional storage purposes. A second Fat32 BOOT partition will be created and used for Grub booting. Windows will only automatically assign a drive letter to the first partition. Which in turn, makes the fat32 boot partition natively hidden from Windows.
How can I view the hidden partition? You can use DiskMgmt to manually assign a drive letter to the hidden partition to make it accessible.https://googleads.g.doubleclick.net/pagead/ads?us_privacy=1—&client=ca-pub-0932618358223805&output=html&h=60&slotname=6626296877&adk=1184106306&adf=2530178959&pi=t.ma~as.6626296877&w=468&lmt=1651576961&psa=1&channel=1421415778&format=468×60&url=https%3A%2F%2Fwww.pendrivelinux.com%2Fmake-an-exfat-bootable-usb-flash-drive%2F&fwrattr=true&wgl=1&uach=WyJXaW5kb3dzIiwiMTQuMC4wIiwieDg2IiwiIiwiMTAwLjAuNDg5Ni4xMjciLFtdLG51bGwsbnVsbCwiNjQiLFtbIiBOb3QgQTtCcmFuZCIsIjk5LjAuMC4wIl0sWyJDaHJvbWl1bSIsIjEwMC4wLjQ4OTYuMTI3Il0sWyJHb29nbGUgQ2hyb21lIiwiMTAwLjAuNDg5Ni4xMjciXV0sZmFsc2Vd&tt_state=W3siaXNzdWVyT3JpZ2luIjoiaHR0cHM6Ly9wYWdlYWQyLmdvb2dsZXN5bmRpY2F0aW9uLmNvbSIsInN0YXRlIjoyOSwiaGFzUmVkZW1wdGlvblJlY29yZCI6dHJ1ZX1d&dt=1651576961437&bpp=5&bdt=664&idt=55&shv=r20220428&mjsv=m202204270101&ptt=9&saldr=aa&abxe=1&cookie=ID%3D0481720f92d551c3%3AT%3D1651566547%3AS%3DALNI_MbZtnrHhxIXirCtTfeFPG_CqVVV4g&correlator=3908914728755&frm=20&pv=2&ga_vid=1122808645.1651576961&ga_sid=1651576961&ga_hid=412094663&ga_fc=0&u_tz=540&u_his=1&u_h=1080&u_w=1920&u_ah=1032&u_aw=1920&u_cd=24&u_sd=1&dmc=8&adx=472&ady=1489&biw=1903&bih=929&scr_x=0&scr_y=0&eid=44759875%2C44759926%2C44759837%2C31065659%2C21067496%2C31062930&oid=2&pvsid=2889055367870006&pem=170&tmod=1964348309&uas=0&nvt=1&ref=https%3A%2F%2Fwww.google.com%2F&eae=0&fc=896&brdim=0%2C0%2C0%2C0%2C1920%2C0%2C1920%2C1032%2C1920%2C929&vis=1&rsz=%7C%7CeEbr%7C&abl=CS&pfx=0&fu=0&bc=31&ifi=5&uci=a!5&btvi=1&fsb=1&xpc=SLE34XKlNp&p=https%3A//www.pendrivelinux.com&dtd=78
The advantage of using an exFAT partition over a fat32 filesystem for storing ISOs is that you can store bootable ISO files larger than 4GB, and still UEFI boot from them via the Fat32 boot partition. This is necessary because a Fat32 filesystem does not support storing file sizes beyond 4GB.
Caveats: Legacy BIOS booting does not work on a very small select few finicky CSM booted systems. Secure Boot is also not supported via this method.
The Diskpart version packaged with Microsoft Windows 7 and lower (Vista, XP, etc.) is not able to create multiple partitions on removable USB media. The process will fail to make the second partition. However Windows 11, 10, 8 should work fine.
On Linux systems, in order to exFAT format the first partition, the exFAT filesystem driver and utilities must be installed.
Covered below are both Windows and Linux methods to make a USB boot from exFAT. Simply toggle to switch to the exFAT Bootable USB method you prefer to use.https://googleads.g.doubleclick.net/pagead/ads?us_privacy=1—&client=ca-pub-0932618358223805&output=html&h=600&slotname=6626296877&adk=351715055&adf=2396678057&pi=t.ma~as.6626296877&w=250&fwrn=4&fwrnh=100&lmt=1651576961&rafmt=1&psa=1&channel=1421415778&format=250×600&url=https%3A%2F%2Fwww.pendrivelinux.com%2Fmake-an-exfat-bootable-usb-flash-drive%2F&fwr=0&fwrattr=true&rw=250&rpe=1&resp_fmts=4&wgl=1&uach=WyJXaW5kb3dzIiwiMTQuMC4wIiwieDg2IiwiIiwiMTAwLjAuNDg5Ni4xMjciLFtdLG51bGwsbnVsbCwiNjQiLFtbIiBOb3QgQTtCcmFuZCIsIjk5LjAuMC4wIl0sWyJDaHJvbWl1bSIsIjEwMC4wLjQ4OTYuMTI3Il0sWyJHb29nbGUgQ2hyb21lIiwiMTAwLjAuNDg5Ni4xMjciXV0sZmFsc2Vd&tt_state=W3siaXNzdWVyT3JpZ2luIjoiaHR0cHM6Ly9wYWdlYWQyLmdvb2dsZXN5bmRpY2F0aW9uLmNvbSIsInN0YXRlIjoyOSwiaGFzUmVkZW1wdGlvblJlY29yZCI6dHJ1ZX1d&dt=1651576961442&bpp=3&bdt=669&idt=146&shv=r20220428&mjsv=m202204270101&ptt=9&saldr=aa&abxe=1&cookie=ID%3D0481720f92d551c3%3AT%3D1651566547%3AS%3DALNI_MbZtnrHhxIXirCtTfeFPG_CqVVV4g&prev_fmts=468×60&correlator=3908914728755&pv_ch=1421415778%2B&frm=20&pv=1&ga_vid=1122808645.1651576961&ga_sid=1651576961&ga_hid=412094663&ga_fc=0&u_tz=540&u_his=1&u_h=1080&u_w=1920&u_ah=1032&u_aw=1920&u_cd=24&u_sd=1&dmc=8&adx=472&ady=2459&biw=1903&bih=929&scr_x=0&scr_y=0&eid=44759875%2C44759926%2C44759837%2C31065659%2C21067496%2C31062930&oid=2&pvsid=2889055367870006&pem=170&tmod=1964348309&uas=0&nvt=1&ref=https%3A%2F%2Fwww.google.com%2F&eae=0&fc=896&brdim=0%2C0%2C0%2C0%2C1920%2C0%2C1920%2C1032%2C1920%2C929&vis=1&rsz=%7C%7CeEbr%7C&abl=CS&pfx=0&fu=128&bc=31&ifi=6&uci=a!6&btvi=2&fsb=1&xpc=maJCqf1KQR&p=https%3A//www.pendrivelinux.com&dtd=151
1. To get started, Open a Command Prompt as admin.
1.) From the Windows ‘⌕ Type here to search’ box, type cmd.exe
2.) Then click Run as administrator.
2. Type the following and press enter to launch Disk Management Tool.
diskmgmt.msc
Note which Disk and drive letter belong to your USB.
3. Back at the command prompt, type diskparthttps://7e83e8a73432a6810aabcfbcc0daf0b7.safeframe.googlesyndication.com/safeframe/1-0-38/html/container.html
diskpart
4. To select the disk, type the following replacing # with your USB disk number.
sel disk #
5. Then to wipe the disk, (WARNING: all existing content will be deleted) type the following one line at a time;
clean
convert mbr
6. Next to list the disk info so we can set size in the next step, type;
list diskAnd then note the size of your select * Disk in MB.
7. Now to prepare the first exFAT partition, type the following;
cre par pri
shrink minimum=50
format fs=exfat label=USB quick
8. Next to create and format the second partition as fat32, type;
cre par pri
format fs=fat32 label=BOOT quick
assign
9. Then, to verify the created partitions and volumes, type;
list par
list vol
IMPORTANT: note which drive letter was assigned to your fat32 BOOT partition. You’ll need it when installing Grub2.
10. To leave diskpart, type;
exit
1. Download Grub2 from A1ive’s repository, and extract (using 7Zip) its contents to your Windows desktop.
Note: you’ll first need to extract the .tar file from the .gz, and then extract the contents of the .tar file. Once finished, you should have a grub folder containing the contents on your desktop.
2. Next to change to the grub directory, type or copy/paste the following;https://googleads.g.doubleclick.net/pagead/ads?us_privacy=1—&client=ca-pub-0932618358223805&output=html&h=600&slotname=6626296877&adk=3183142477&adf=898579077&pi=t.ma~as.6626296877&w=250&fwrn=4&fwrnh=100&lmt=1651576969&rafmt=1&psa=1&channel=1421415778&format=250×600&url=https%3A%2F%2Fwww.pendrivelinux.com%2Fmake-an-exfat-bootable-usb-flash-drive%2F&fwr=0&fwrattr=true&rw=250&rpe=1&resp_fmts=4&wgl=1&uach=WyJXaW5kb3dzIiwiMTQuMC4wIiwieDg2IiwiIiwiMTAwLjAuNDg5Ni4xMjciLFtdLG51bGwsbnVsbCwiNjQiLFtbIiBOb3QgQTtCcmFuZCIsIjk5LjAuMC4wIl0sWyJDaHJvbWl1bSIsIjEwMC4wLjQ4OTYuMTI3Il0sWyJHb29nbGUgQ2hyb21lIiwiMTAwLjAuNDg5Ni4xMjciXV0sZmFsc2Vd&tt_state=W3siaXNzdWVyT3JpZ2luIjoiaHR0cHM6Ly9wYWdlYWQyLmdvb2dsZXN5bmRpY2F0aW9uLmNvbSIsInN0YXRlIjoyOSwiaGFzUmVkZW1wdGlvblJlY29yZCI6dHJ1ZX1d&dt=1651576961445&bpp=2&bdt=672&idt=235&shv=r20220428&mjsv=m202204270101&ptt=9&saldr=aa&abxe=1&cookie=ID%3D0481720f92d551c3%3AT%3D1651566547%3AS%3DALNI_MbZtnrHhxIXirCtTfeFPG_CqVVV4g&prev_fmts=468×60%2C250x600&correlator=3908914728755&pv_ch=1421415778%2B&frm=20&pv=1&ga_vid=1122808645.1651576961&ga_sid=1651576961&ga_hid=412094663&ga_fc=0&u_tz=540&u_his=1&u_h=1080&u_w=1920&u_ah=1032&u_aw=1920&u_cd=24&u_sd=1&dmc=8&adx=488&ady=6579&biw=1903&bih=929&scr_x=0&scr_y=2906&eid=44759875%2C44759926%2C44759837%2C31065659%2C21067496%2C31062930&oid=2&psts=AGkb-H-7z9XUz3kdF7IzSWY2A-mx-VXrzXZLWOrbg3uI7h9nVqe63S9hv4dYLugXbsoM0axb-BxofB09p7Ufppo&pvsid=2889055367870006&pem=170&tmod=1964348309&uas=0&nvt=1&ref=https%3A%2F%2Fwww.google.com%2F&eae=0&fc=896&brdim=0%2C0%2C0%2C0%2C1920%2C0%2C1920%2C1032%2C1920%2C929&vis=1&rsz=%7C%7CeEbr%7C&abl=CS&pfx=0&fu=128&bc=31&ifi=7&uci=a!7&btvi=3&fsb=1&xpc=kK3Q9UrvS1&p=https%3A//www.pendrivelinux.com&dtd=8517
cd %UserProfile%\Desktop\grub3. To install Grub2 for BIOS and UEFI type or copy/paste the following,
(replacing X with your BOOT drive letter and # your Disk number),
and then press Enter.
grub-install.exe --force --no-floppy --target=i386-pc --boot-directory=X:\boot //./PHYSICALDRIVE#
grub-install.exe --force --removable --no-floppy --target=x86_64-efi --boot-directory=X:\boot --efi-directory=X:\
grub-install.exe --force --removable --no-floppy --target=i386-efi --boot-directory=X:\boot --efi-directory=X:\
Congratulations, you should have an exFAT bootable USB flash drive that is now able to Grub2 Boot from both Legacy BIOS and UEFI.https://7e83e8a73432a6810aabcfbcc0daf0b7.safeframe.googlesyndication.com/safeframe/1-0-38/html/container.html
Upon completion, simply reboot your pc, select the USB drive from your BIOS or UEFI boot device menu, and then Boot. If all went well, you should be presented with Grub2!
Booting your select ISO files from a flash drive prepared as an exFAT bootable USB;
Grub can read from an exFAT filesystem using this method because it includes an exFAT driver module. However, to actually be able to boot from a Live ISO stored on the exFAT partition via loopback requires that the distribution also include a driver, and that the exFAT partition is automounted during boot. Otherwise, once the boot process has been handed over, the path to the ISO will no longer be found. When that happens, you’ll likely be dropped into a BusyBox shell.
Yes, there are a couple of ways to circumvent this requirement;
PartNew to create and mount the ISO to a temporary partition.map --mem to map the ISO to a memory address (if you have enough system memory).This concludes the detailed procedure to create an exFAT bootable USB flash drive. Once I find the time, I plan to automate this functionality by adding the exFAT USB Boot feature to the YUMI Multiboot USB Software.
menuentry “Android-x86-r9.0-k49” –class android –class arch {
set root='(hd0,4)’
linux /android-9.0-r2/kernel quiet root=/dev/ram0 androidboot.selinux=permissive buildvariant=userdebug SRC=/android-9.0-r2
initrd /android-9.0-r2/initrd.img
}
menuentry “Linux Mint” –class ubuntu –class gnu-linux –class gnu –class os $menuentry_id_option ‘gnulinux-simple-dd798bbc-31e1-4851-9002-8bb902512d5c’ {
recordfail
load_video
gfxmode $linux_gfx_mode
insmod gzio
if [ x$grub_platform = xxen ]; then insmod xzio; insmod lzopio; fi
insmod part_gpt
insmod ext2
set root=’hd0,gpt5′
if [ x$feature_platform_search_hint = xy ]; then
search –no-floppy –fs-uuid –set=root –hint-bios=hd0,gpt5 –hint-efi=hd0,gpt5 –hint-baremetal=ahci0,gpt5 dd798bbc-31e1-4851-9002-8bb902512d5c
else
search –no-floppy –fs-uuid –set=root dd798bbc-31e1-4851-9002-8bb902512d5c
fi
linux /boot/vmlinuz-5.4.0-91-generic root=UUID=dd798bbc-31e1-4851-9002-8bb902512d5c ro quiet splash $vt_handoff
initrd /boot/initrd.img-5.4.0-91-generic
}
menuentry “Windows 11” –class windows –class os $menuentry_id_option ‘osprober-efi-D4F5-1C76’ {
insmod part_gpt
insmod fat
set root=’hd0,gpt1′
if [ x$feature_platform_search_hint = xy ]; then
search –no-floppy –fs-uuid –set=root –hint-bios=hd0,gpt1 –hint-efi=hd0,gpt1 –hint-baremetal=ahci0,gpt1 D4F5-1C76
else
search –no-floppy –fs-uuid –set=root D4F5-1C76
fi
chainloader /EFI/Microsoft/Boot/bootmgfw.efi
}
menuentry “Windows User-PE” –class windows {
set root=(hd1,1)
insmod part_gpt
insmod ntfs
insmod chain
chainloader /efi/boot/bootx64.efi
}
menuentry “Acronis True Image 2021” –class dvd {
linux /boot/dat10.dat vga=791 root=/dev/ram0 quiet
initrd /boot/dat11.dat /boot/dat12.dat
}
menuentry “Android-x86-r9.0” –class android –class arch {
set root='(hd0,1)’
linux /android-9.0-r2/kernel quiet root=/dev/ram0 vmalloc=192M SRC=/android-9.0-r2
initrd /android-9.0-r2/initrd.img
}
menuentry “ChromeOS-Flex” –class puppy{
insmod part_gpt
insmod ext2
set root='(hd1,12)’
search –no-floppy –fs-uuid –set 6DA7-6C94
drivemap -s (hd0) ${root}
chainloader +1
}
menuentry “Linux-Mint” –class ubuntu –class gnu-linux –class gnu –class os $menuentry_id_option ‘gnulinux-simple-fd22e979-6f63-4b94-a1db-cdf55ec28370’ {
recordfail
savedefault
load_video
gfxmode $linux_gfx_mode
insmod gzio
if [ x$grub_platform = xxen ]; then insmod xzio; insmod lzopio; fi
insmod part_msdos
insmod ext2
set root=’hd0,msdos3′
if [ x$feature_platform_search_hint = xy ]; then
search –no-floppy –fs-uuid –set=root –hint-bios=hd0,msdos3 –hint-efi=hd0,msdos3 –hint-baremetal=ahci0,msdos3 fd22e979-6f63-4b94-a1db-cdf55ec28370
else
search –no-floppy –fs-uuid –set=root fd22e979-6f63-4b94-a1db-cdf55ec28370
fi
linux /boot/vmlinuz-5.4.0-91-generic root=UUID=fd22e979-6f63-4b94-a1db-cdf55ec28370 ro quiet splash $vt_handoff
initrd /boot/initrd.img-5.4.0-91-generic
}
menuentry “Windows11” –class windows {
set root='(hd0,msdos4)’
insmod part_msdos
insmod ntldr
insmod ntfs
ntldr /bootmgr
}
menuentry “True Image 2021” –class dvd {
linux /boot/dat10.dat vga=791 root=/dev/ram0 quiet
initrd /boot/dat11.dat /boot/dat12.dat
}
출처 : https://hiseon.me/linux/ubuntu/ubuntu-vpn-client/
우분투 데스크탑 버전등 GUI 환경일 경우 VPN 연결 방법입니다. 아래의 명령어를 이용하여 VPN 클라이언트 패키지를 설치해 주시기 바랍니다.
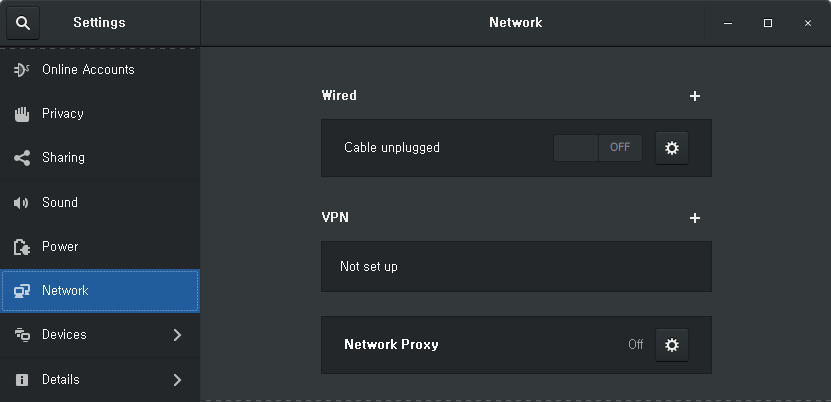
$ sudo apt install network-manager-pptp그리고 좌측 상단 [Activities] 메뉴를 클릭한 다음, Settings 을 검색 후 실행합니다.

[Network] 탭을 선택 한 다음 VPN 영역에서 [+]을 클릭하셔서 VPN 연결설정을 시작합니다.
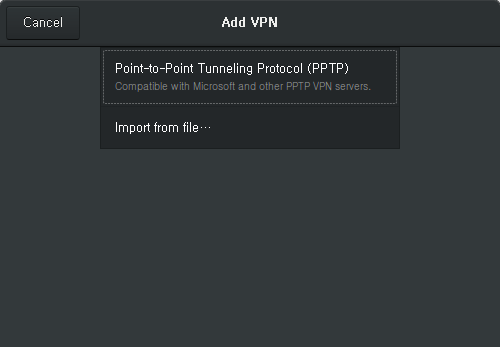
여러종류의 VPN 설정을 할 수 있는데, 이 글에서는 PPTP 프로토콜 설정방법에 대해서 설명드리도록 하겠습니다. Point-to-Point Tunneling Protocol(PPTP) 을 선택합니다.
VPN 연결 설정 내용이 나타나면 연결 이름(Name), VPN 서버(Gateway), 사용자 명 등을 입력합니다. 비밀번호 입력이 되지 않을 수 있는데 비밀번호는 연결을 맺을 때 입력하면 됩니다.
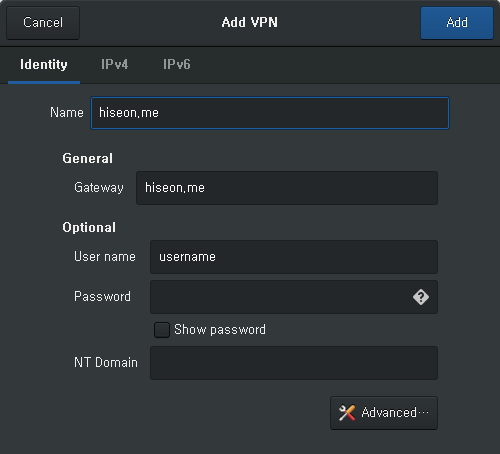
기본적인 설정 정보를 입력하고, 필요하다면 [Advanced] 버튼을 클릭한 다음 추가 설정을 합니다.
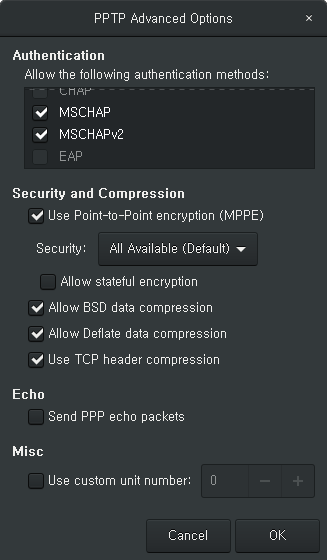
아래의 내용은 MSCHAP, MSCHAPv2 인증방법만 활성화 하고 모두 해제하였습니다. 그리고 [Use Point-to-Point encryption (MPPE)] 기능을 활성화하였습니다.
VPN 접속 설정이 모두 이뤄졌으면 [OK] 버튼을 클릭하여 연결 설정을 종료합니다.
그리고 Network 설정 팝업에서 생성된 VPN 연결정보 버튼을 클릭하여 연결합니다.

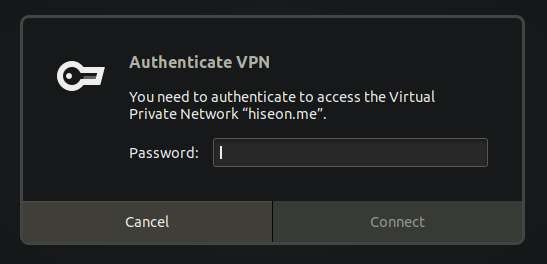
아래와 같이 VPN 접속 계정의 패스워드를 묻는 팝업에서 비밀번호를 입력하면 됩니다.
성공적으로 VPN 연결이 이뤄지면 상단의 아이콘이 아래와 같이 나타게 됩니다.

출처 : https://blogger.pe.kr/922
Synology NAS의 PPTP VPN 서버 설정 방법을 이전 포스트에서 설명했는데 한가지 설명을 빠트렸었다. 무엇인고 하니 설명한 환경에서 NAS를 SuperDMZ 또는 DMZ(NAT) 기능을 이용해 집의 인터넷 공유기에 할당되는 공인IP를 통채로 NAS에 할당한 경우에만 가능한 방법이다.
그렇지 않고 통신사에 연결되는 인터넷 공유기에는 공인IP가 할당되고 NAS에는 192.X.X.X로 표시되는 사설IP가 할당될 경우에는 PPTP, IPSEC 등의 VPN은 정상동작시키기 쉽지 않다. 인터넷 공유기에서 포트포워딩을 해줘야할 포트도 여러개인데다 설정을 하더라도 제대로 동작하지 않는 경우가 많기 때문이다.
그래서 오늘은 하나의 포트만 포트포워딩 하면 사용할 수 있는 OpenVPN 서버의 설정방법을 포스팅한다.
통신사에서 제공하는 인터넷 공유기의 경우 다음과 같이 “포트포워딩(Port Forwarding)” 기능을 제공하는 경우가 대부분이다.

위의 경우 외부의 UDP 10472 포트를 내부망 192.168.219.102 IP의 10472 포트로 포워딩 해주는 정책이다. 192.168.219.102가 바로 시놀로지 NAS다. 즉 NAS에서 실행될 OpenVPN 서버가 UDP/10472 포트에서 OpenVPN 클라이언트의 접속을 기다리는 것이다.
많은 시놀로지 사용자들이 OpenVPN 서버를 설정하면서 부닥치는 가장 큰 난관은 바로 인증서 설정과 관련된 부분이다. 일단 “인증서”가 뭔지 제대로 이해를 하지 못하고 있기 때문이다.
컴퓨터에서 사용되는 “인증서”는 컴퓨터의 신원을 보증하고 통신의 데이터를 암호화 할 때 사용되는 두 개의 암호키가 담겨져 있는 작은 파일이라고 이해하면 된다. 그리고 이 때 사용되는 암호기술이 바로 “PKI”다. (깊이 들어가면 너무 어지러워지니 이정도만 설명한다. ^^)
기본적으로 시놀로지 NAS의 접속을 HTTPS로 한다면 이미 인증서는 만들어져 있을 것이다. 하지만 이 포스트에서는 OpenVPN에서 전용으로 사용할 인증서를 새로 만들어보기로 한다. (기존의 기본 인증서로 설정해도 관계 없다. 생성하는 과정만 건너 뛰면 모든 작업은 동일하다.)
먼저 “제어판”에서 “보안” 메뉴를 선택하면 표시되는 “인증서” 탭을 선택한다.

“추가” 버튼을 누르고 “인증서 생성” 창이 실행되면 “새 인증서 추가” 를 선택한 다음 “다음” 버튼을 누른다.
“설명” 에는 적당한 설명을 넣는다. 그리고 “자체 서명 인증서 생성”을 선택한다.

다음과 같이 루트(CA) 인증서 생성에 필요한 기본값을 입력한다. 대충 입력해도 된다.

루트(CA) 인증서를 만들 정보를 입력하고 나면 실제 통신 시 사용할 인증서를 만들게 된다. 입력하는 정보가 아주 조금 다른데… 대충~ 에러가 나지 않도록만 입력하면 된다.

“적용” 버튼을 누르면 다음과 같이 인증서가 반들어진다. 그리고 인증서의 유효기간은 생성한 날로부터 1년이다.

“제어판” – “보안” – “인증서” 탭에서 “구성” 버튼을 누르면 인증서를 사용하는 서비스가 사용할 인증서를 선택할 수 있는 화면이 표시된다.
아래 화면처럼 “VPN Server”가 앞에서 새로 생성한 인증서를 사용하도록 선택해준다.

이제 OpenVPN 서버를 설정해줘야 한다. 시놀로지 NAS에서 VPN 서버 인스톨 방법은 앞의 포스트를 참고하기 바란다. VPN Server를 설정하기 위해서 VPN Server를 실행하고 “OpenVPN” 메뉴를 선택한다.
그리고 “OpenVPN 서버 활성화”를 체크해준 뒤 다음과 같이 설정한다.

여기서 중요한 것은 “포트” 항목에 앞의 인터넷 공유기에서 NAS의 IP인 192.168.219.102의 포트포워딩 포트인 10472를 “포트” 항목에 입력하는 것이다.
그리고 나서 “적용” 버튼을 눌러 OpenVPN 서버를 실행한다.

OpenVPN 서버를 실행하면 화면 아래에 보이는 “내보내기 구성” 버튼이 활성화된다.
이 버튼을 눌러 OpenVPN 클라이언트에서 OpenVPN 서버에 접속할 때 사용할 “설정 파일”을 저장한다.

이 OpenVPN 접속 설정 파일을 적당한 이름으로 저장한다. 위에서는 synology-openvpn(10472).zip 파일로 저장했다. 그리고 하나의 파일을 더 저장해야 한다. 바로 인증서 파일이다.
다시 인증서 화면으로 간 뒤 아래 화면처럼 새로 생성한 인증서 파일을 “인증서 내보내기” 버튼을 눌러 PC에 저장한다.

인증서 파일은 기본적으로 archive.zip 파일로 저장된다.
지금가지 두개의 파일을 PC에 저장했다. OpenVPN 클라이언트에서 사용할 접속 설정 파일과 인증서 파일 두 개다. 이제 이 두개 파일의 압축을 해제한 뒤 편집해야 한다.
Synology에서 제공하는 VPN 서버의 버그인지… 아니면 원래 그런 것인지 모르겠지만 앞에서 다운로드 받은 OpenVPN 클라이언트 접속 용 구성 파일은 인증서 정보가 제대로 설정되어 다운로드 되지 않는다. 그래서 수동으로 인증서 내용을 편집해 넣어줘야 한다.
먼저 다음과 같이 인증서가 저장된 archive.zip과 OpenVPN 접속 설정파일인 synology-open….zip 파일의 압축을 해제한다.

인증서 압축파일을 해제하면 4개의 파일이 표시되는데 cert.pem 파일과 prikey.pem 파일의 내용을 OpenVPN 접속 구성 파일에 추가해줘야 한다.

OpenVPN 접속 구성 파일이 포함된 zip 파일을 압축해제하면 VPNConfig.ovpn 이라는 OpenVPN 접속 용 구성파일이 보인다. 이 파일을 Notepad 등으로 열어준다.

먼저 상단에 위치한 YOUR_SERVER_IP를 인터넷 공유기에 할당된 외부 공인IP로 수정한다. 만약 시놀로지의 DDNS를 이용해 xxx.synology.me 와 같은 도메인주소를 사용한다면 그 도메인주소를 입력해주면 된다.

다음은 새로운 Notepad을 열어 인증서 파일들 중 cert.pem 파일을 다음과 같이 연다.

위의 cert.pem 파일의 내용 전체를 다음과 같이 VPNConfig.ovpn 파일을 열고 가장 아래부분의 </ca> 뒷 부분에 <cert> 태그를 추가하고 그 뒤에 붙여넣는다.

그리고 가장 뒷 부분에 </cert>을 추가한다.
마찬가지로 인증서 파일들 중 prikey.pem 파일의 내용을 모두 복사해 VPNConfig.ovpn 파일의 맨 뒷 부분에 <key> 태그를 추가한 뒤 붙여넣는다.

그리고 맨 끝에 </key>를 추가해준 뒤 저장한다.
여기까지 진행하면 OpenVPN 클라이언트 프로그램이 OpenVPN 서버에 접속할 때 사용할 구성파일이 완성된다.
OpenVPN 서버에 접속하여 암호화 된 안전한 Private(사설) 네트워크를 만들기 위해서는 OpenVPN GUI라는 클라이언트 프로그램을 설치하여야 한다. 다운로드는 여기에서 받으면 된다.
기본 옵션으로 설치한 뒤 앞에서 편집한 VPNConfig.ovpn 파일을 아래와 같이 기본 config 경로에 복사한다.

이 때 관리자권한이 필요한데 관리자 권한을 부여하여 복사해 넣으면 된다.
설치하고 나면 VPNConfig 라는 접속 구성이 보인다. 아래와 같이 “연결”을 눌러 OpenVPN 서버에 접속하면 된다.

ID와 비밀번호를 묻는 창이 실행되면 시놀로지의 접소계정을 입력하면 된다. 다만 해당 계정은 시놀로지 DSM에서 OpenVPN 접속이 허용된 계정이어야 한다.

접속이 되면 다음과 같이 접속상태를 확인할 수 있고 “연결해제” 버튼을 눌러 VPN 네트워크를 파괴하여 접속을 끊을 수도 있다.
